Wednesday 26 March 2014

Battle of Hood vs. Bismarck (December 1941)

In late 1941, following an abortive attempt at a breakout in May the Bismarck, escorted by the heavy cruiser Prinz Eugen, sortied into the Atlantic. In the Denmark Strait the two German vessels were intercepted by the British battlecruiser Hood and battleship Prince of Wales. The British and German ships closed with each other and the battle of the Denmark Strait began.

Outnumbering the Germans in terms of heavy guns it might have been expected that the Bismarck was overmatched, but the German vessel was brand new, while the British ships, especially the Hood were either ageing or so new as to be suffering teething problems. Early on in the battle the Prince of Wales was hit in her engineering section and brought to a standstill. The Hood closed to avoid plunging fire but the accuracy of the German gunnery was devastating. After less than an hour of fighting the legendary Hood was sunk.

The battle wasn't over however. The combined fire of the British vessels had slowed the Bismarck to a crawl and caused her significant damage. The Prince of Wales and Bismarck, both unable to disengage, now participated in a macabre duel, until finally the Bismarck succumbed, sinking slowly into the cold North Atlantic.

The Prince of Wales, heavily damaged, was not to escape the victor however. Having been largely left unmolested during the battle and sensing the British battleship was unable to manoeuvre, the Prinz Eugen moved in for the kill. At short range she pummled the Prince of Wales until the British battleship was little more than a burning hulk. The remaining crew abandoned her and she sank sometime during the ensuing night.

The battle of the Denmark Strait was viewed as unacceptable to both sides. A gunnery duel between giants that seemed to hark back to the previous war, the battle had left neither side the victor. The Bismarck had been prevented from commerce raiding, but the British had lost two capital ships in the process. It was clear that neither side would accept such an encounter on equal terms again unless they had no choice...

Order of Battle:

Great Britain
 - Battlecruiser Hood SUNK
 - Battleship Prince of Wales SUNK

Germany
 - Battleship Bismarck SUNK
 - Cruiser Prinz Eugen

**Historical note: The Bismarck sunk the Hood but was sunk in turn after the Royal Navy expended all their energies to sink her. In our encounter, the Prince of Wales and Hood managed to take down the mighty German Battleship, with Prinz Eugen finishing off the British!

Battle of Malta

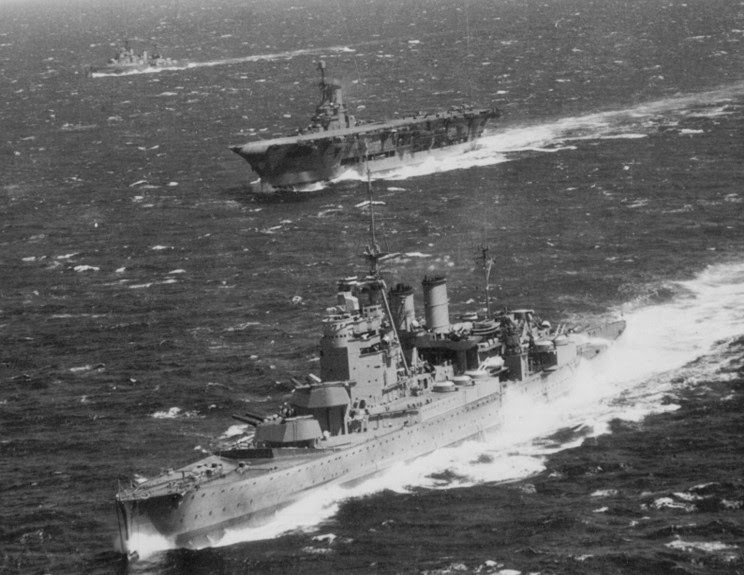
While the British were sending forces to the Far East, the US, convinced by Winston Churchill of the plan to knock Italy out of the war, sent a powerful naval fleet to the Mediterranean. It would be months before the US army could build up a meaningful presence in Europe, and US public opinion was fixed on Japan. However to signal their intent to carry the fight to the axis in Europe, the Tennessee, California and five cruisers were sent to Europe immediately, escorted by destroyers and two submarines.

During 1940 and 1941 the British and Italian fleets had largely avoided each other, concentrating on escorting their respective convoys carrying supplies to their forces in Africa. With the Axis on the offensive on North Africa the British could hardly afford to carry out offensive operations against the Regia Marina, but this restriction did not apply to the forces of America.

Prelude to Malta

The first action between the US navy and the Italians occured on 2nd January 1942, almost as soon as the American task force lead elements had arrived. The Americans aided the British by blockading the seas around Malta, acting as a screen against the Italians sortieing from Taranto.

In the early morning of an extremely windy day, and in poor visibility, the Italian Cruiser Gorizia suddenly stumbled across US forces picketing the area. US destroyers raced to intercept her, having detected the Italian vessel on radar, supported by the cruiser USS Phoenix. An extremely one sided skirmish followed and the Gorizia was soon sunk.

Battle of Malta


Reports soon reached the main body of the Italian fleet in the Mediterranean, that they had lost a cruiser to "light American forces". The Italian admiralty was at first delighted, despite having lost a Zara class vessel. The inexperienced US navy had brashly entered the "Mare Nostrom", and now, with the super dreadnought Vittorio Venetto  at sea, escorted by two WWI battleships, Italy had the chance of scoring a major victory over the new entrants to the war.

The super dreadnought was accompanied by the battleships Andrea Dorea and Guilio Cesare. Both vessels were serviceable WWI battleships, but the Vittorio Venetto was one of the finest battleships in the world. Around the small besieged island of Malta the Italian force closed with the US fleet, unaware of just how large it was and lacking the radar to work it out before it was too late.

Amid rain squalls and heavy seas the two fleets met. The Italian commander was slightly surprised by the size of the enemy fleet, and the presence of two American battleships initially gave him pause for thought. However, his three battleships should have been a match for the Americans, even if they also possessed a fleet of four fast cruisers.

The battle took place in appalling weather, and despite early success with the Vittorio Venetto scoring multiple hits on the California, the Italian shooting was generally ineffective, thanks largely to the bad weather. The Italians particularly struggled to deal with the US destroyers, who quickly closed on the italian fleet, launching their torpedoes at the Guilio Cesare.

The Italian dreadnought had not been sufficiently modified in the inter-war years, and now her age counted against her. The battleship took several hits below the waterline from accurate American torpedo strikes, and within minutes the old dreadnought heeled over and sank.

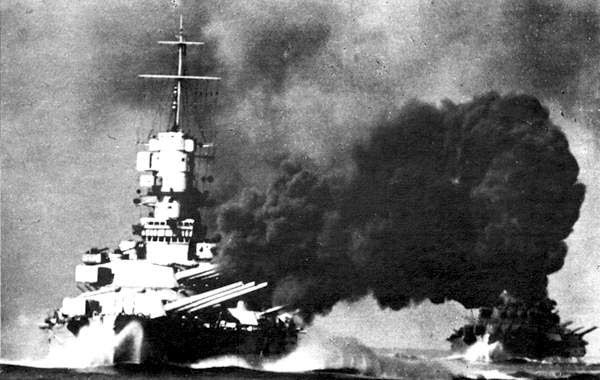
Suddenly the wind was knocked out of the Italian fleet. With their heavy guns still failing to reduce the effectiveness of the two US battleships and the American cruisers crossing their path in front of them, the Regia Marina force began to turn to port to disengage. However at this moment the fire from Tennessee and California dealt a fatal blow. Lucky shots from the two US vessels slammed into the Vittorio Venetto just as it seemed she must escape. Crippled, the super dreadnought was temporarily brought to a stop and unable to fire, her main systems knocked out. Now she was a sitting duck. Within minutes the American vessels poured shot after shot into her, and it may have been the cruiser Northampton which dealt the killing blow.

The Italian destroyers, who had had their own private duel with American submarines, now launched a torpedo run of their own against the California. They managed three hits, but the US had fitted torpedo belts to their battleships, and despite inflicting some damage, the California only briefly slowed before continuing the pursuit of the Italian fleet.

The "fleet" now consisted of the Andrea Doria who was now performing a series of evasive manoeuvres, desperately attempting to shake off her pursuers. Eventually the Italian vessel escaped behind a rain squall, but not before she had been seriously damaged by another destroyer torpedo run.

The battle ended with spectacular success for the US fleet. Not a single ship had been lost and the damage to the California was superficial. In exchange the Italians had lost - overall - two battleships and a heavy cruiser, with another battleship crippled. This included a Littorio class, one of four, the finest Italian ships they could put to sea.


Order of Battle:

Prelude to Malta:
USA
 - Cruiser Phoenix
 - 3 Destroyers

Italy
 - Cruiser Gorizia SUNK

Battle of Malta:
USA
 - Battleship Tennessee
 - Battleship California
 - Cruiser Northampton
 - Cruiser Chicago
 - Cruiser Pensacola
 - Cruiser Portland
 - 4 Destroyers
 - 2 submarines (Ray, Sawfish)

Italy
 - Battleship Vittorio Venetto SUNK
 - Battleship Andrea Doria CRIPPLED
 - Battleship Guilio Cesare SUNK
 - 4 Destroyers 2 SUNK

Tuesday 25 March 2014

Disaster at the Solomon Sea!

Following the attack on Pearl Harbour the British Prime Minister Winston Churchill decided to send a force of British ships to the Far East to deter Japanese aggression against British posessions in the region. Forze Z was formed with Rear admiral Charles Edward Barrington Simeon hoisting his flag on the battlecruiser Renown. Joining this force was the aircraft carrier Illustrious and the cruisers Bonaventure and Newcastle, escorted by four destroyers.

The force arrived in Darwin on 22nd January 1942, and then prepared to escort troop convoys to Port Moresby on 23rd, since Papau New Guinnea had just been invaded by Japanese forces. Force Z sailed into the Solomon Sea and on 26th January was spotted in good conditions by Rear Admiral Gunji Kogure aboard the battleship Mutsu, which was leading a flotilla based around her and a fleet carrier.

Realising the Japanese battleship had greater range, the British advanced with the Renown and Newcastle racing to get in range, the Illustrious dropping back escorted by her anti-aircraft cruiser Bonaventure, and launching an immediate strike with her Swordfish torpedo bombers. The Japanese also prepared an air strike, but Kogure turned his force leisurely to port, bringing the Mutsu's guns to bear on the British force. As the destroyers closed with each other between the two fleets, the Japanese opened fire a little after 3pm local time.

The first salvoes were a disaster for the British. Plunging shot from the Mutsu found its target, a shell passing through the Renown's relatively thin deck armour into the engineering section. The resulting explosion killed many engineers and stopped the engines dead. The screws stopped turning and for the next vital half an hour Renown was dead in the water.

Newcastle at first didn't notice the catastrophe and continued her charge towards the enemy fleet, now unaided. Renown managed to get a few shots off and inflict some damage on her enemy, but like a sitting duck the British battlecruiser took a pounding from the Mutsu's 15 inch guns, with more shells raining down on her, several adding to the carnage in the engine rooms. Eventually the crew managed to get the Renown slowly moving again, but by that time it was too late, the Renown had taken too much damage, and at 4:30pm, she rolled over and sank.

While the Japanese fleet concentrated on the Renown, to buy her time the Newcastle charged at the Japanese fleet, along with four destroyers. The destroyers were able to make a torpedo run before being sunk in turn by Japanese Long Lance warheads, and the Mutsu suffered significant damage. Her firing was put off for several minutes and she developed a list from internal flooding, but overall the Japanese vessel was still battleworthy. The combined fire of her secondary armarment and fire from the Japanese heavy cruiser eventually crippled the Newcastle. She was finished off by Japanese divebombers launched from the escorting carrier.

The Illustrious contributed to the battle by launching fighters and three flights of Fairey Swordfish. These slow biplanes managed to reach the Japanese battle line, but only because of the sacrifice of many a Fairey Fulmar pilot. Dogfighting above the ocean, the Fulmars were outclassed by the zeros, but they ensured the bombers got to their target. The Swordfish pilots braved anti-aircraft fire and managed to hit the Mutsu several times, causing further damage and internal flooding. Her speed was greatly reduced and X turret was put out of action, but her fires and flooding were controlled to allow her to limp home to port after the battle.

None of the swordfish returnded to the Illustrious, who by now had reversed course under a smokescreen, accompanied by the Bonaventure. Before the Japanese broke off to escort their battleship back to port, long range fire from her and the heavy cruiser slammed into the light British cruiser, causing her to heel over and sink in dramatic fashion. Only the Illustrious was able to get away.

The battle of the Solomon Sea was an unmitigated disaster for the British. They had badly damaged a second rate Japanese battleship and sunk one destroyer. In return the Japanese had all but sunk the British force Z and paved the way for the invasion of Papau New Guinnea. Port Moresby fell only a few weks later. Winston Churchill described the affair as "the Nadir of Empire".

Order of Battle:

Japan 
 - Battleship Mutsu - CRIPPLED 
 - Carrier
 - Cruiser Takao
 - 4 Destroyers - 1 SUNK 

Great Britain 
 - Battlecruiser Renown - SUNK 
 - Carrier Illustrious
 - Cruiser Newcastle - SUNK 
 - Cruiser Bonaventure - SUNK 
 - 4 Destroyers - 4 SUNK 

DECISIVE JAPANESE VICTORY

**Historical note: In late 1941 Winston Churchill did send a force to represent Britain in the pacific, but it was the Repulse and Prince of Wales. The two capital ships lacked air cover and were sunk by the Japanese air force with no naval loss to the Japanese. Just like in our campaign, the humiliating British defeat was a terrible start to the far east campaign!**